Introduction to the Unity Editor
Published on Aug 17, 2022 by Arun Michael Dsouza
The Unity Editor is an integrated development environment (IDE) that provides all the necessary tools in one place for developing, designing and deploying graphics applications.
It is a cross-platform tool that was released in 2005 as a Mac-only game engine, since then it has evolved into a powerful creative platform catering to several industries - Gaming (2D/3D), AR/VR, Transportation, Manufacturing, Architecture, Film etc.
In this blog post, we’ll be looking at the details of the Unity Editor, how to install and use it. We’ll create a simple 3D scene and add basic game objects to it.
Downloading and Installing the Unity Editor
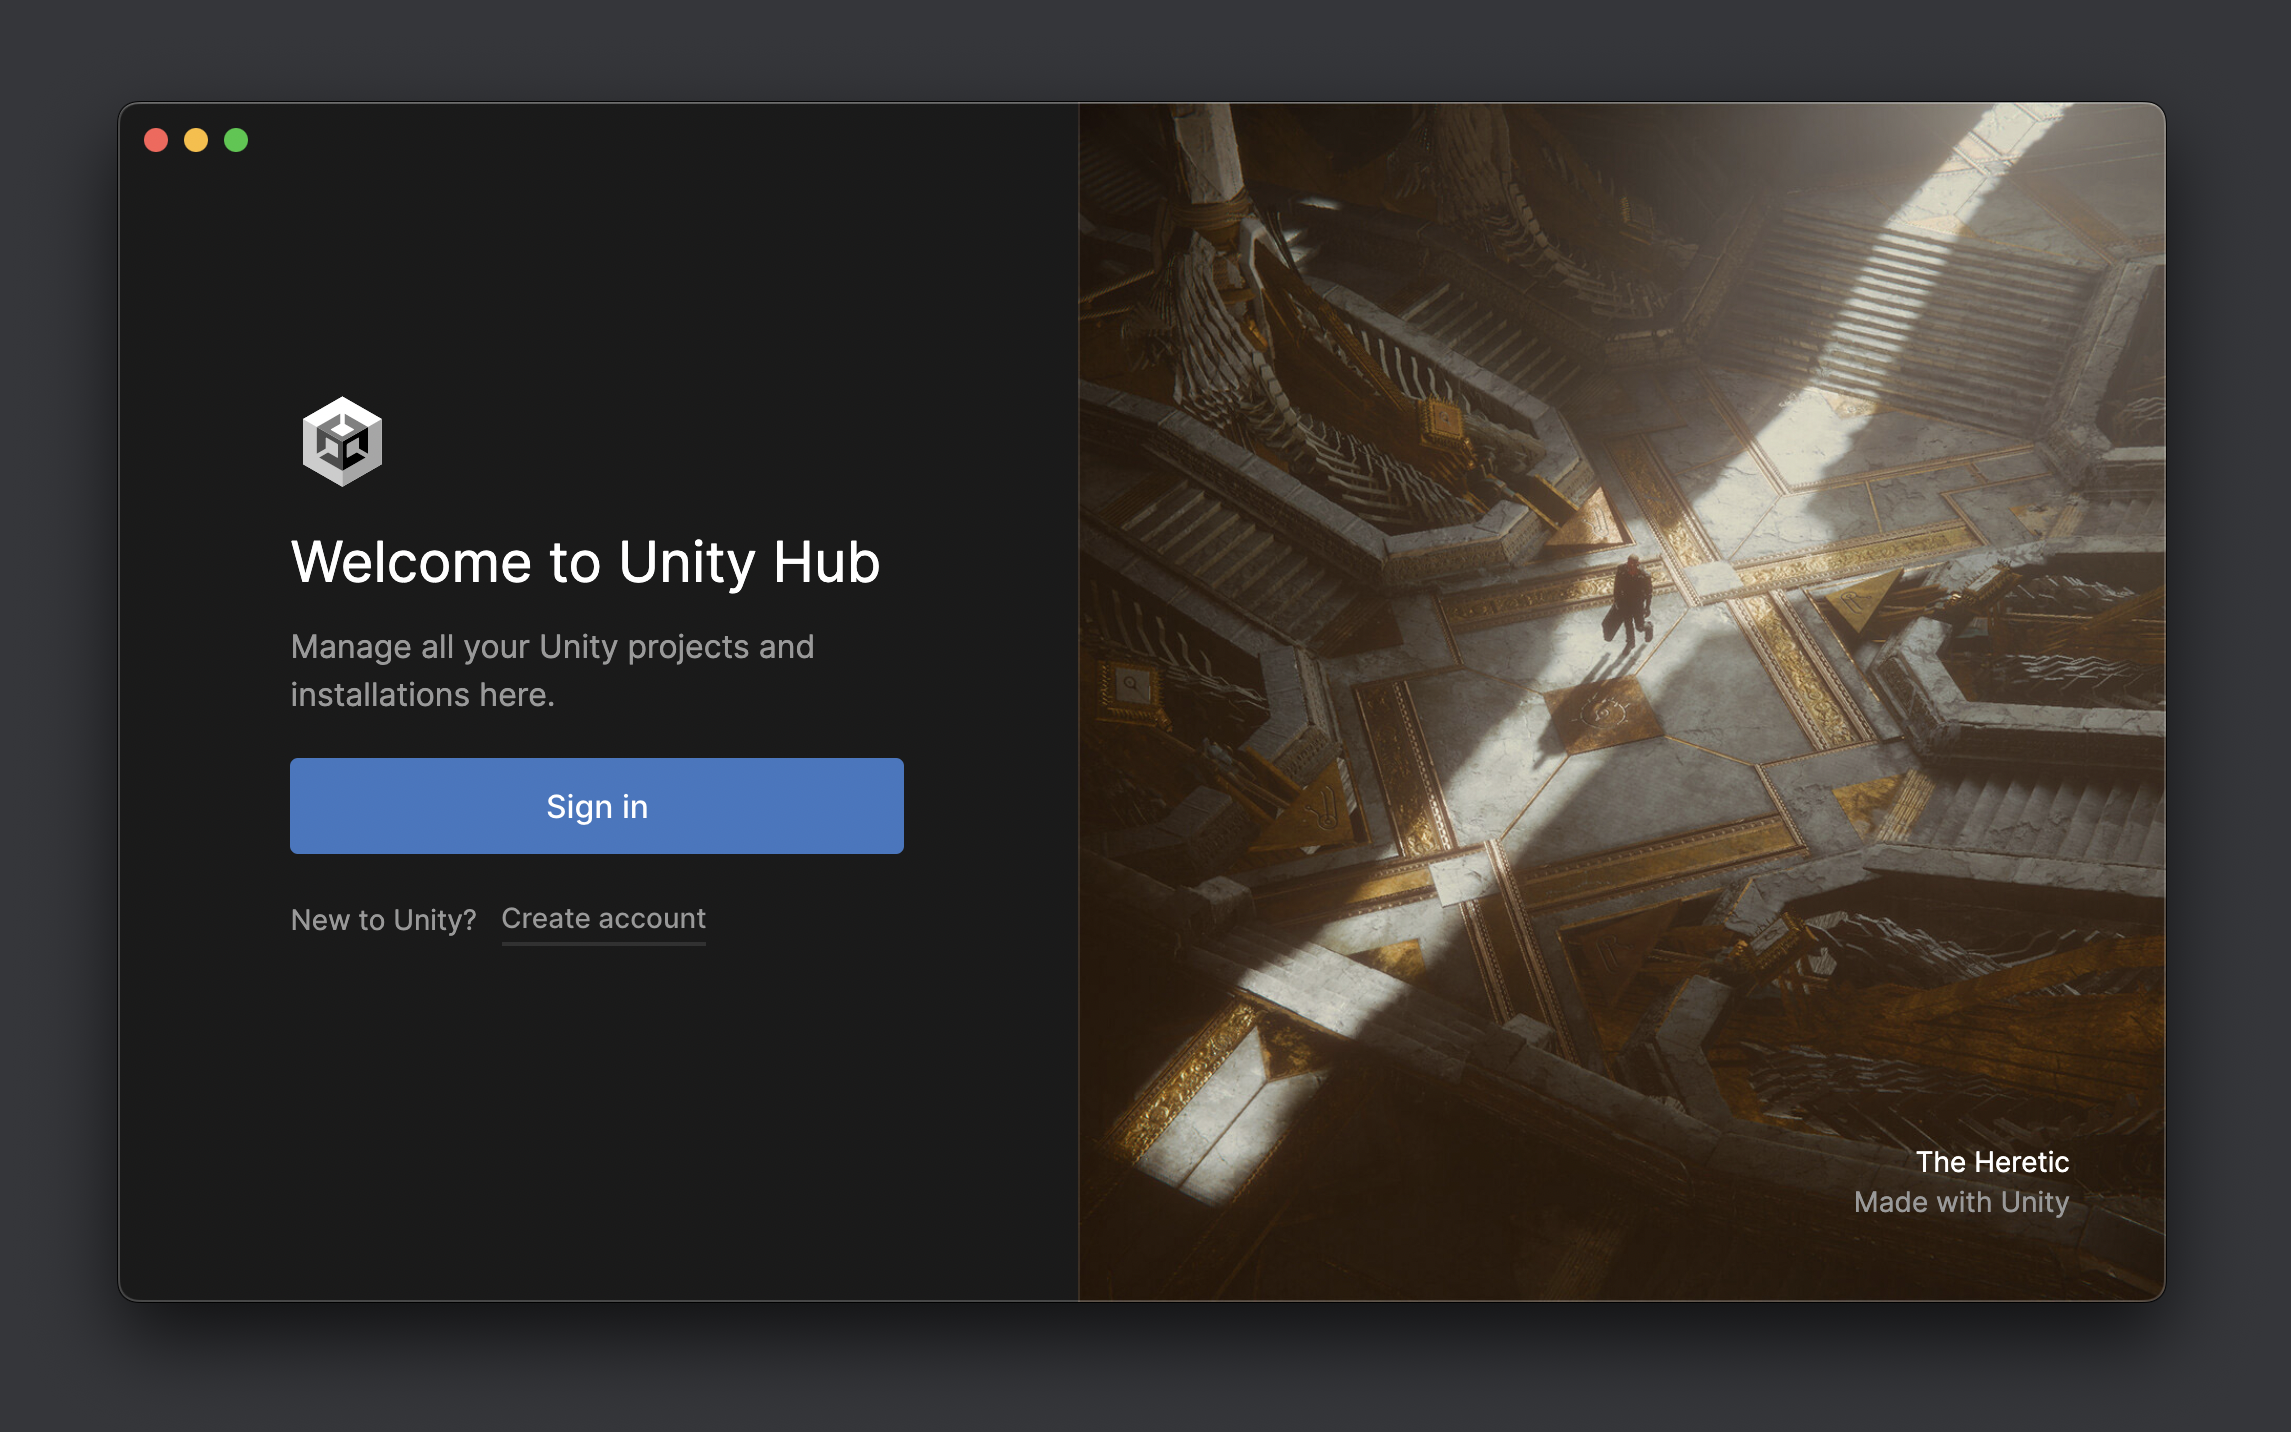
The Unity Editor can be installed using Unity Hub which is a standalone application used for creating and managing Unity projects. It also lets you install various releases of the Unity Editor and manage your Unity ID and Unity Plans/Licenses.
Unity Hub is available for Windows, Mac and Linux for free. It can be downloaded from the Download Unity page. When you open Unity Hub for the first time, you’ll be asked to sign in using your Unity ID. If you don’t have one then you’ll need to create it since it is required to access all of the services across the Unity platform.
Once signed in, you’ll be asked to install the Unity Editor (Unity Hub will automatically select the recommended version for you) and you’ll also be asked to get a Unity plan.
Note: To know how you can download and install Unity on your system, you can check out this blog post. Once installed, you can sign up for the free Personal Plan to start using Unity.
Unity Editor Interface
The Unity Editor interface is divided into multiple windows. The arrangement of the windows can be modified as needed.
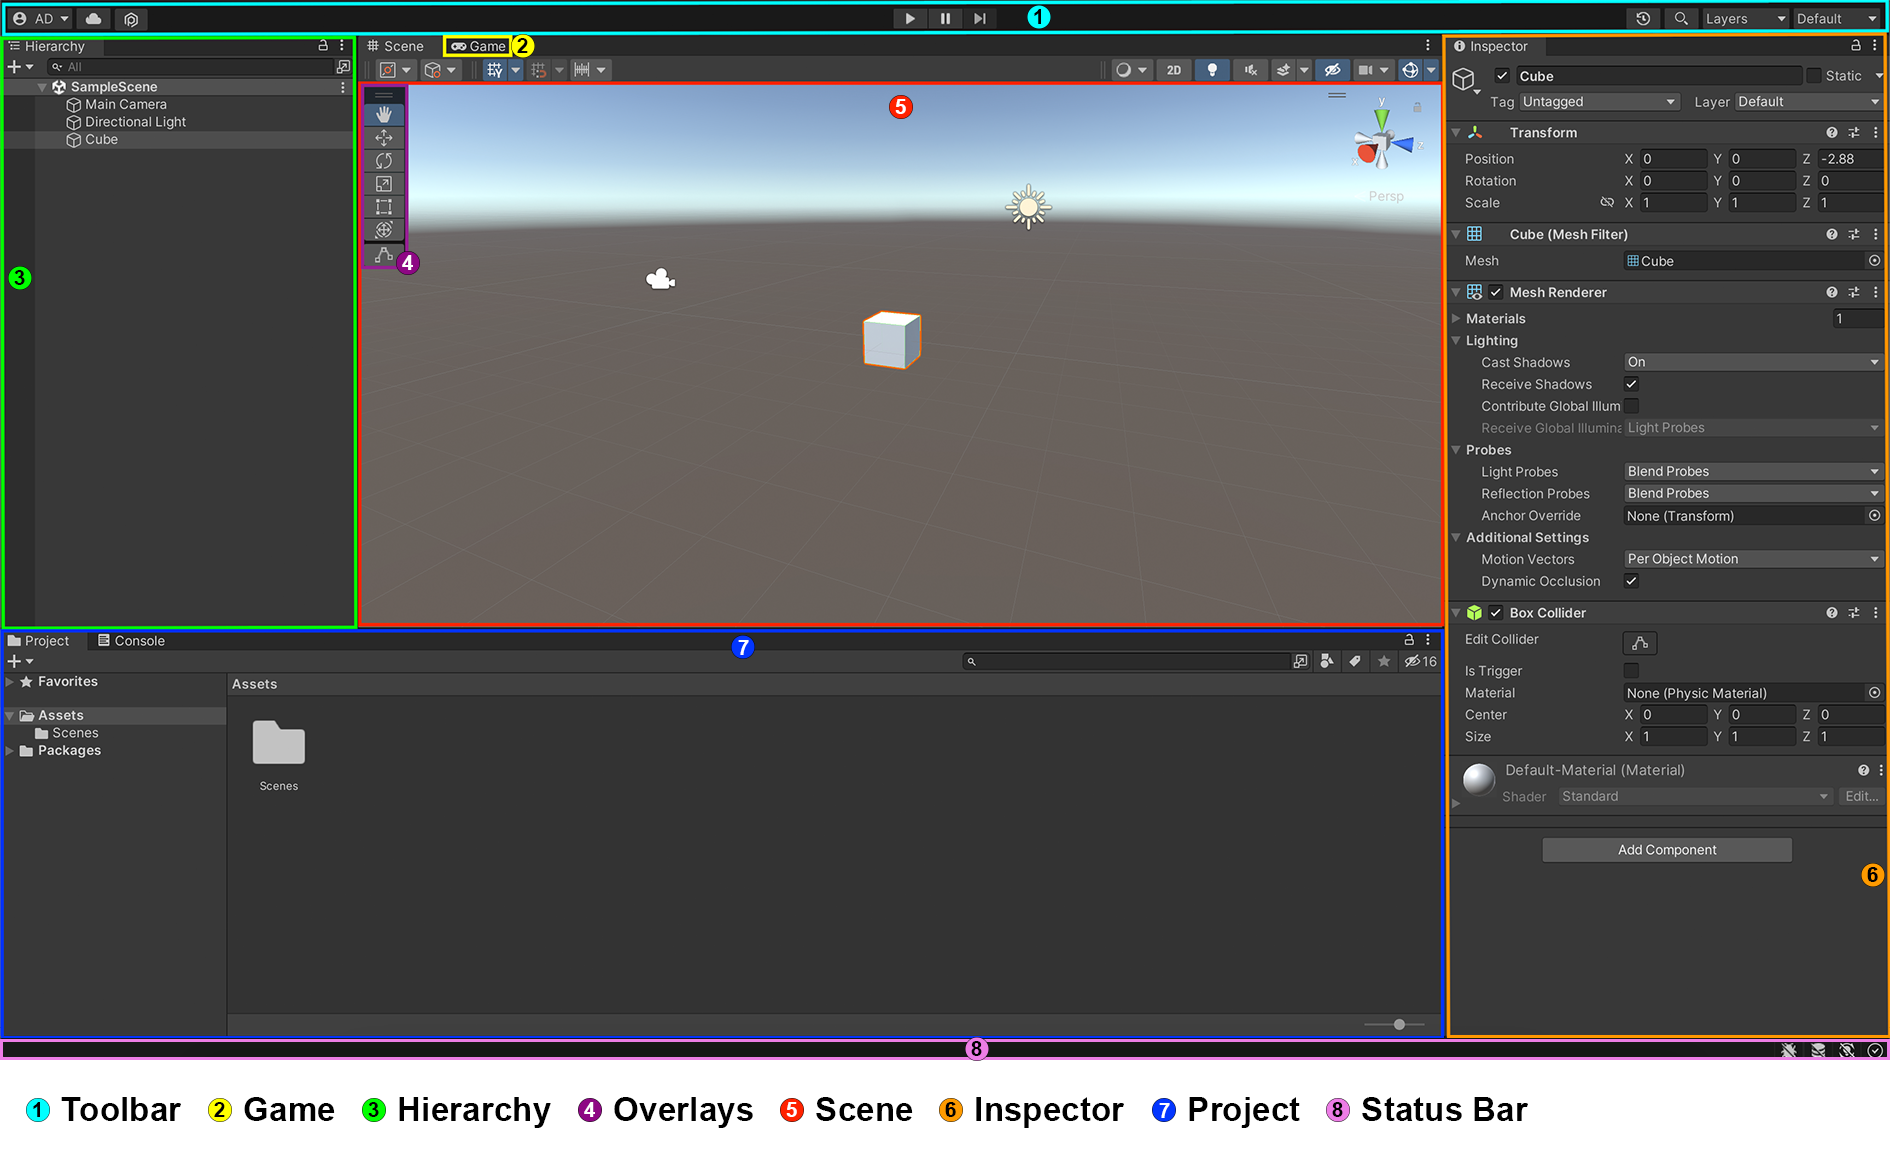
The default layout consists of the following windows -
Toolbar
The toolbar is at the top of the editor and contains controls to switch between the scene and game windows, manage your Unity ID and adjust the layout of the editor windows.
Game
The game window is where the compiled and rendered game can be playtested.
Hierarchy
The hierarchy window is used to organize all of the game objects in a scene.
Overlays
The overlays are part of the scene window which contain controls to adjust the game objects in the view. These are functions that allow you to view, move, rotate and scale your game objects. You can adjust which overlays you want to keep in your scene window for quick access.
Scene
The scene window contains all of the game objects in the current scene (a scene can be a specific level or menu). These objects can be characters, items, backgrounds, sound effects etc. This is the window that you interact with to add and modify your objects to design and build your application.
Inspector
The inspector window is used to configure a particular game object’s properties. It lets you add new behaviors and components to the objects.
You can click on an game object to view all of its properties.
Project
The project window is used to add and organize all of the assets in your application. These assets can be models, textures, scripts, scenes etc. It is a file explorer for your project in which assets are organized into folders. You can drag and drop any external asset into this window to save it in your project, and then drag it from the project window to the scene window to use it in the scene.
Note: The project window contains all of the assets that belong to your project, which can be used and shared in different scenes. Whereas the hierarchy window only contains assets that belong to a particular scene. These assets become GameObjects (objects with special properties and behaviors) once they are added to a scene.
Status Bar
The status bar provides notifications about Unity processes and access to related settings.
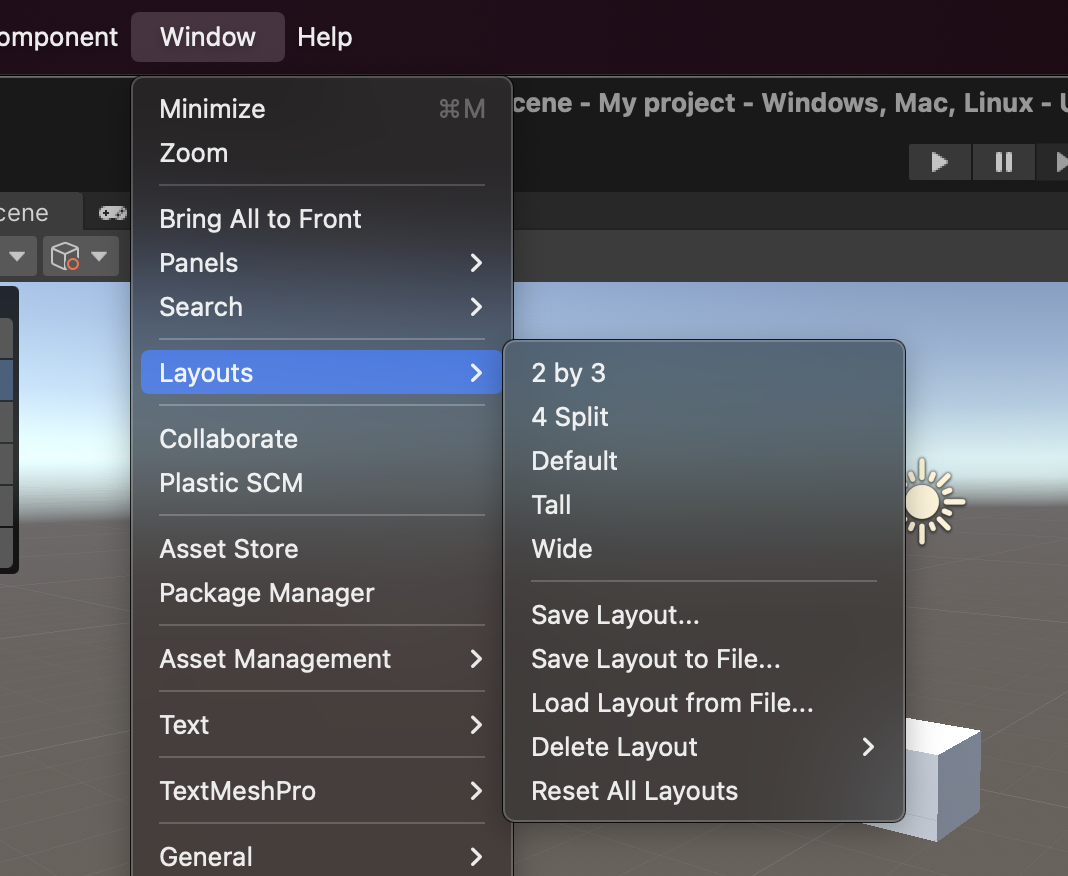
The arrangement of the windows can be adjusted by going to Window > Layouts and selecting a layout. You might prefer one layout over another depending on what you are doing. Some layouts are better for level design and some might be better for scripting.
You can also create your own layout based on how you want the arrangement of the windows to be, and you can save that layout.
What Is a Scene
A scene is an asset that contains all of the components of a graphics application. This can be a part of the application or the complete application itself. Think of it as a level in a game or a menu that the user interacts with.
It is an interactive window that you use to build and design your application by adding and configuring other assets like models, backgrounds, textures etc. in the scene.
There is no limit to the number of scenes an application can have, the only requirement is that an application should have at least one scene.
Creating a New Scene
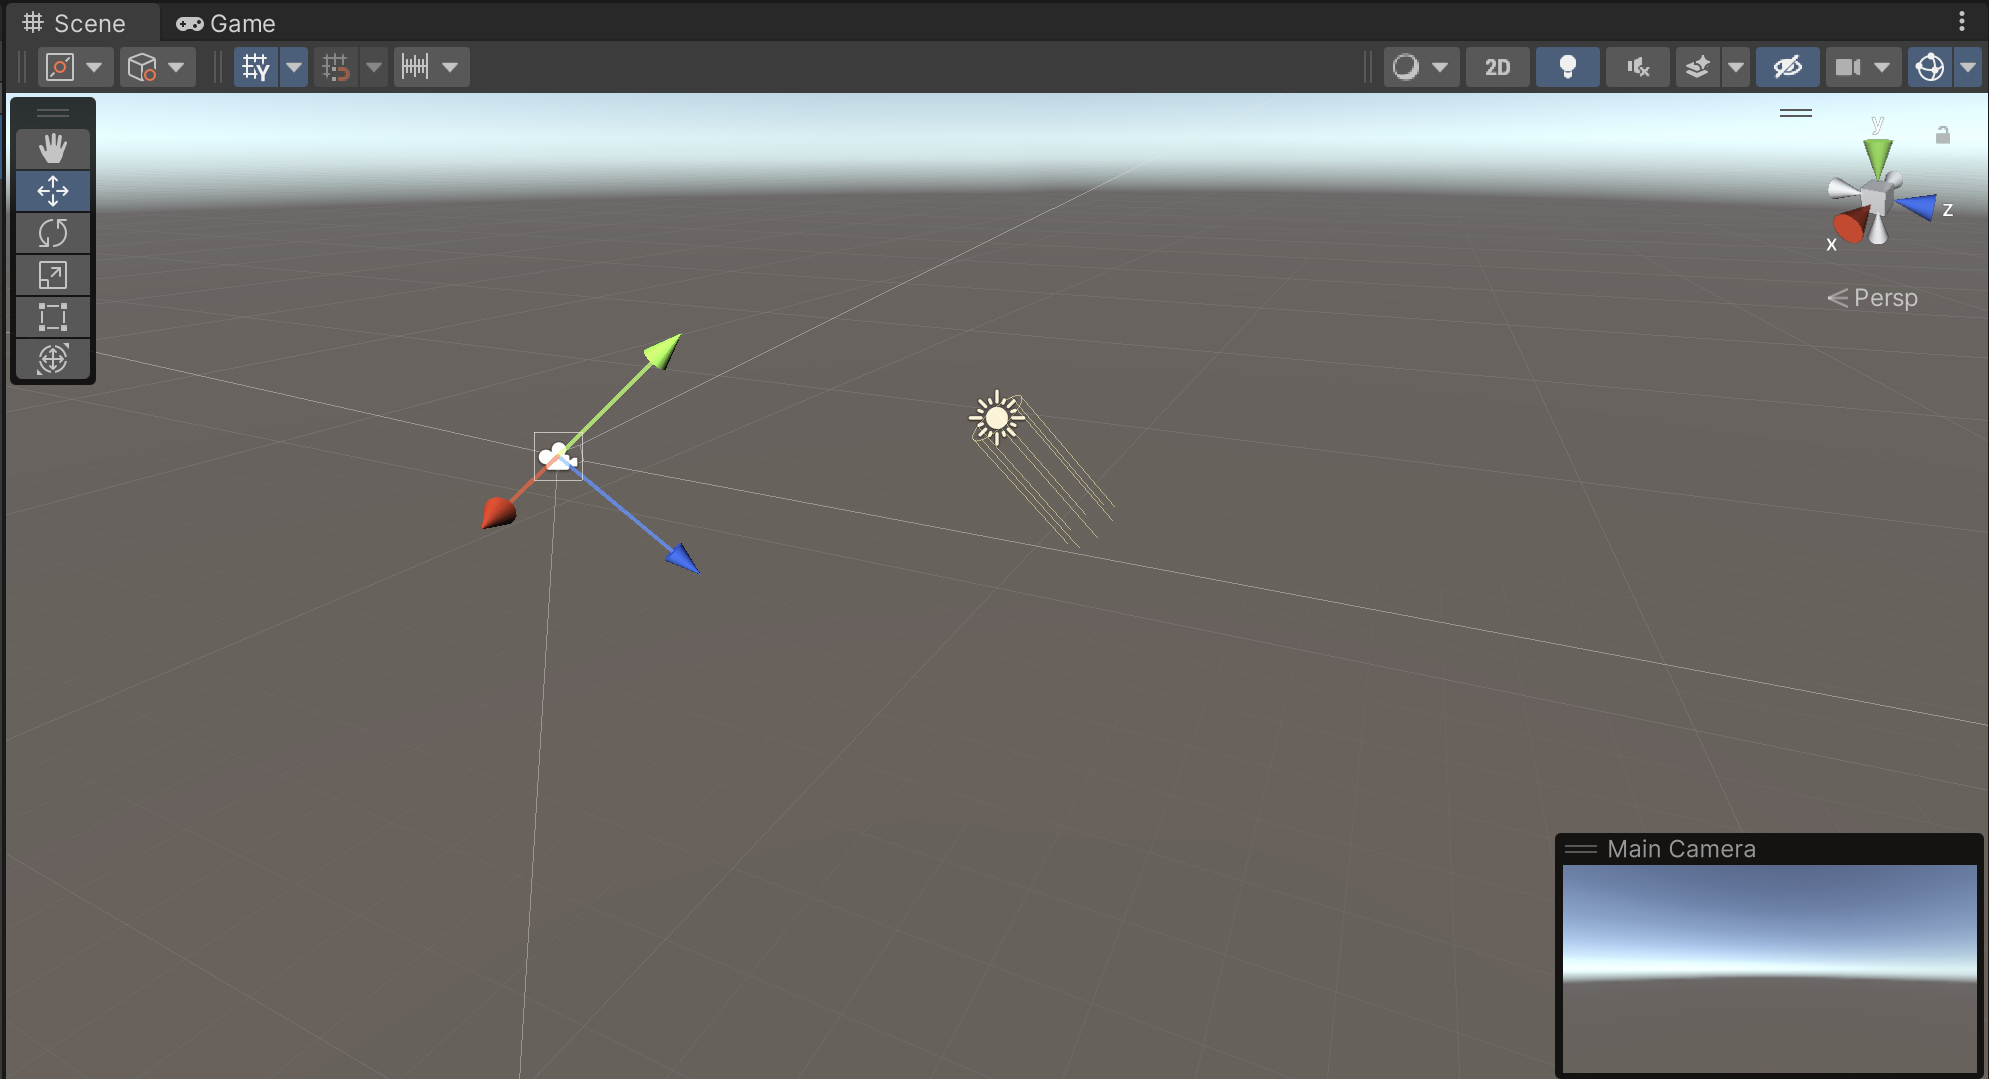
Whenever a new project is created using Unity Hub or the Unity Editor, a sample scene is created by default with a camera and a directional light (part of 3D projects) in it.
A new scene can also be created by going to File > New Scene or by using this keyboard shortcut - Cmd+N (Mac)/Ctrl+N (Windows).
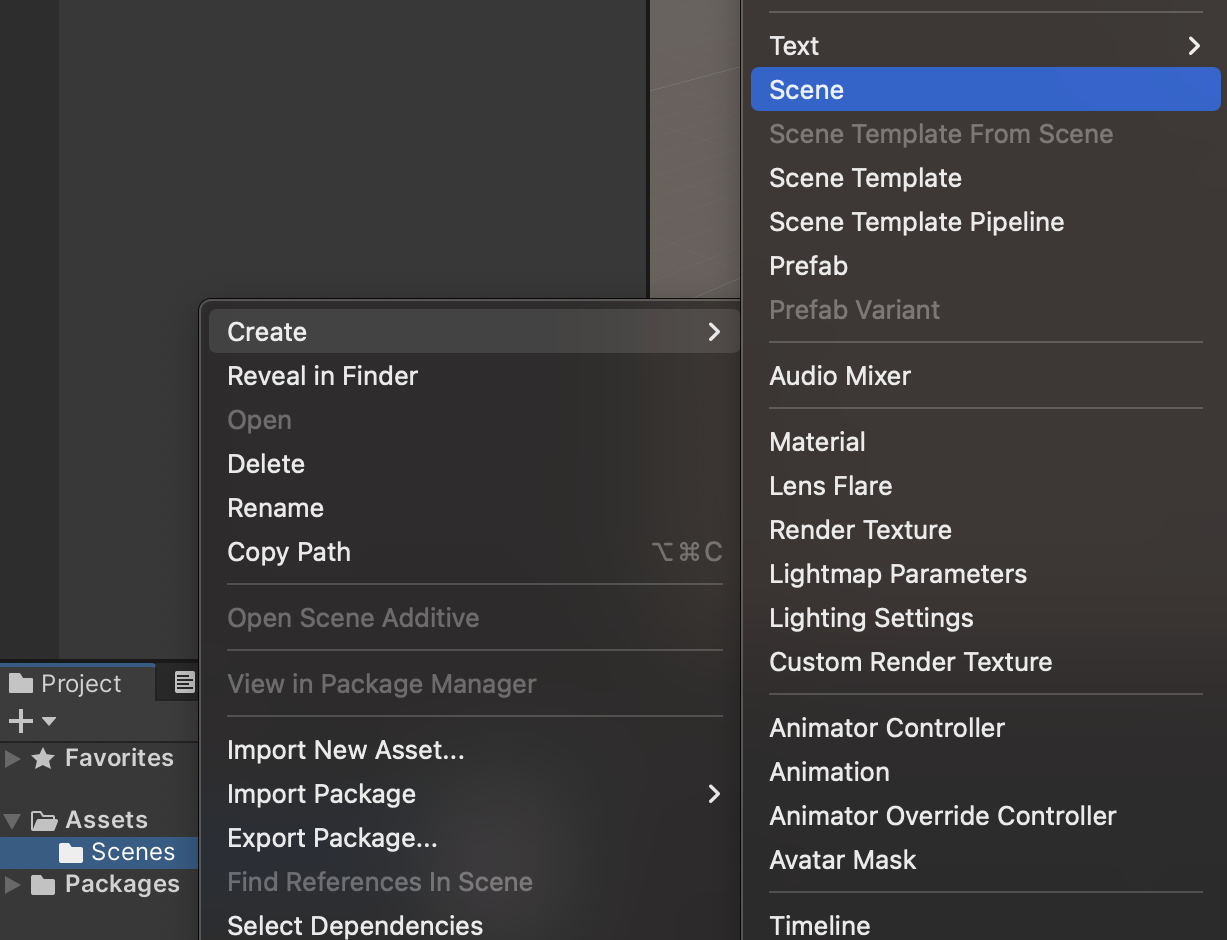
Or you can go to the Project window and right-click on the Scenes folder, go to Create > Scene. Double-clicking on the scene will open it in the editor.
Now let’s create a new 3D project and add a new scene to it using one of the above-mentioned methods.
Adding Objects to a Scene
Once you have a scene created, the next step is to start adding objects to it and building your application. These objects are assets, like character models, backgrounds, sound effects etc. which are basic building blocks of your application. They can be modified to form the desired shapes or can act as placeholders for other assets.
Let’s add a simple 3D cube to our scene. You can do so by going to GameObject > 3D Object > Cube.
Or by right-clicking in the hierarchy window and going to 3D Object > Cube.
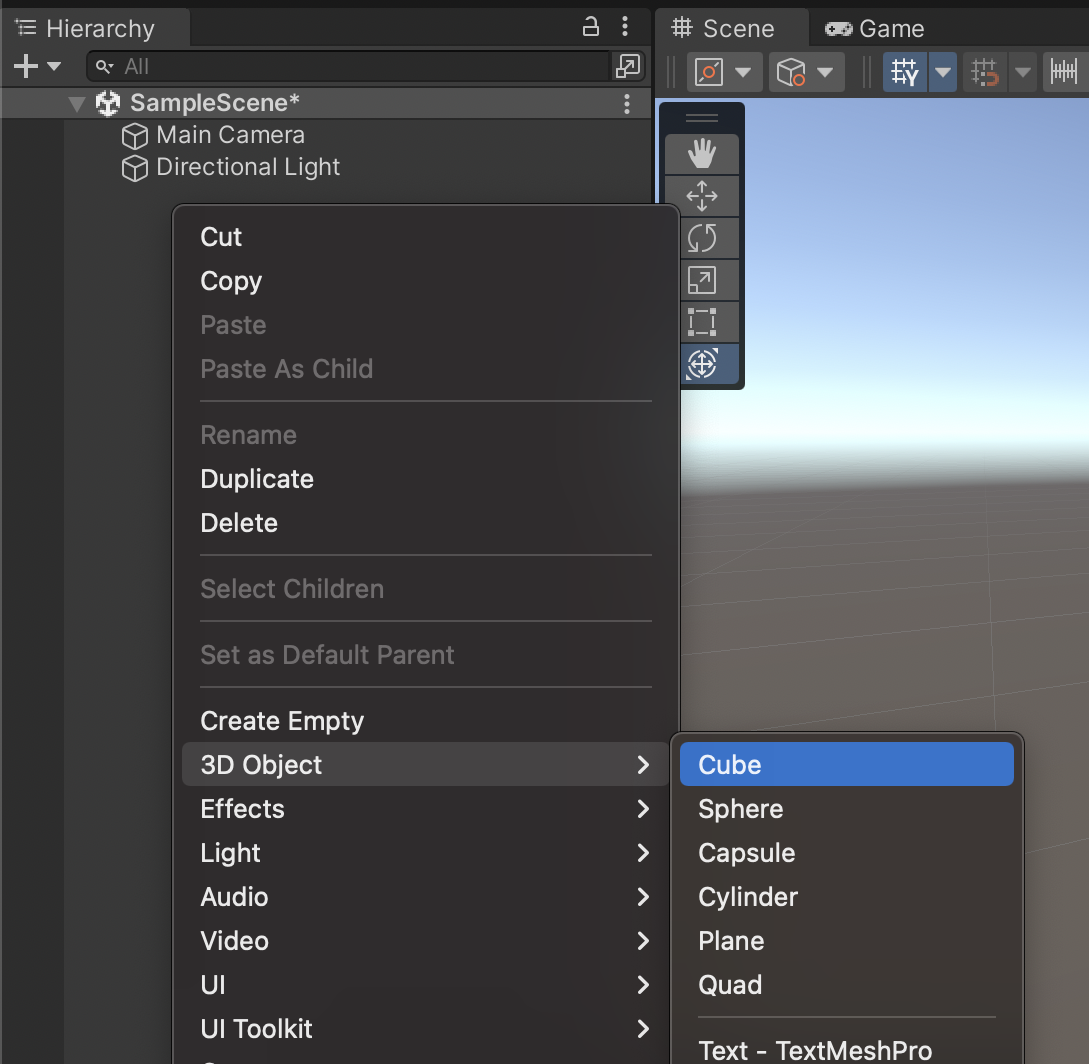
Upon creation, the 3D cube will automatically be added to the hierarchy window and will be visible in the scene that you are in.
You can add as many objects as you want to your scene.
Using the Scene Tools and Settings
The scene window contains various tools to modify and adjust the content of the application that you are developing. It contains tools for moving, rotating, scaling and transforming the assets in the scene window.
It also contains configuration settings for the window itself, like the visibility of the grid, draw modes for scene objects (shaded, wireframe etc.), camera switch (2D/3D), adjustments for lighting and audio in the scene etc.
All of these configuration settings are part of the scene window, grouped into different panels. These panels can be placed on the edges of the scene window or can be dragged out and placed inside the scene itself as overlays.
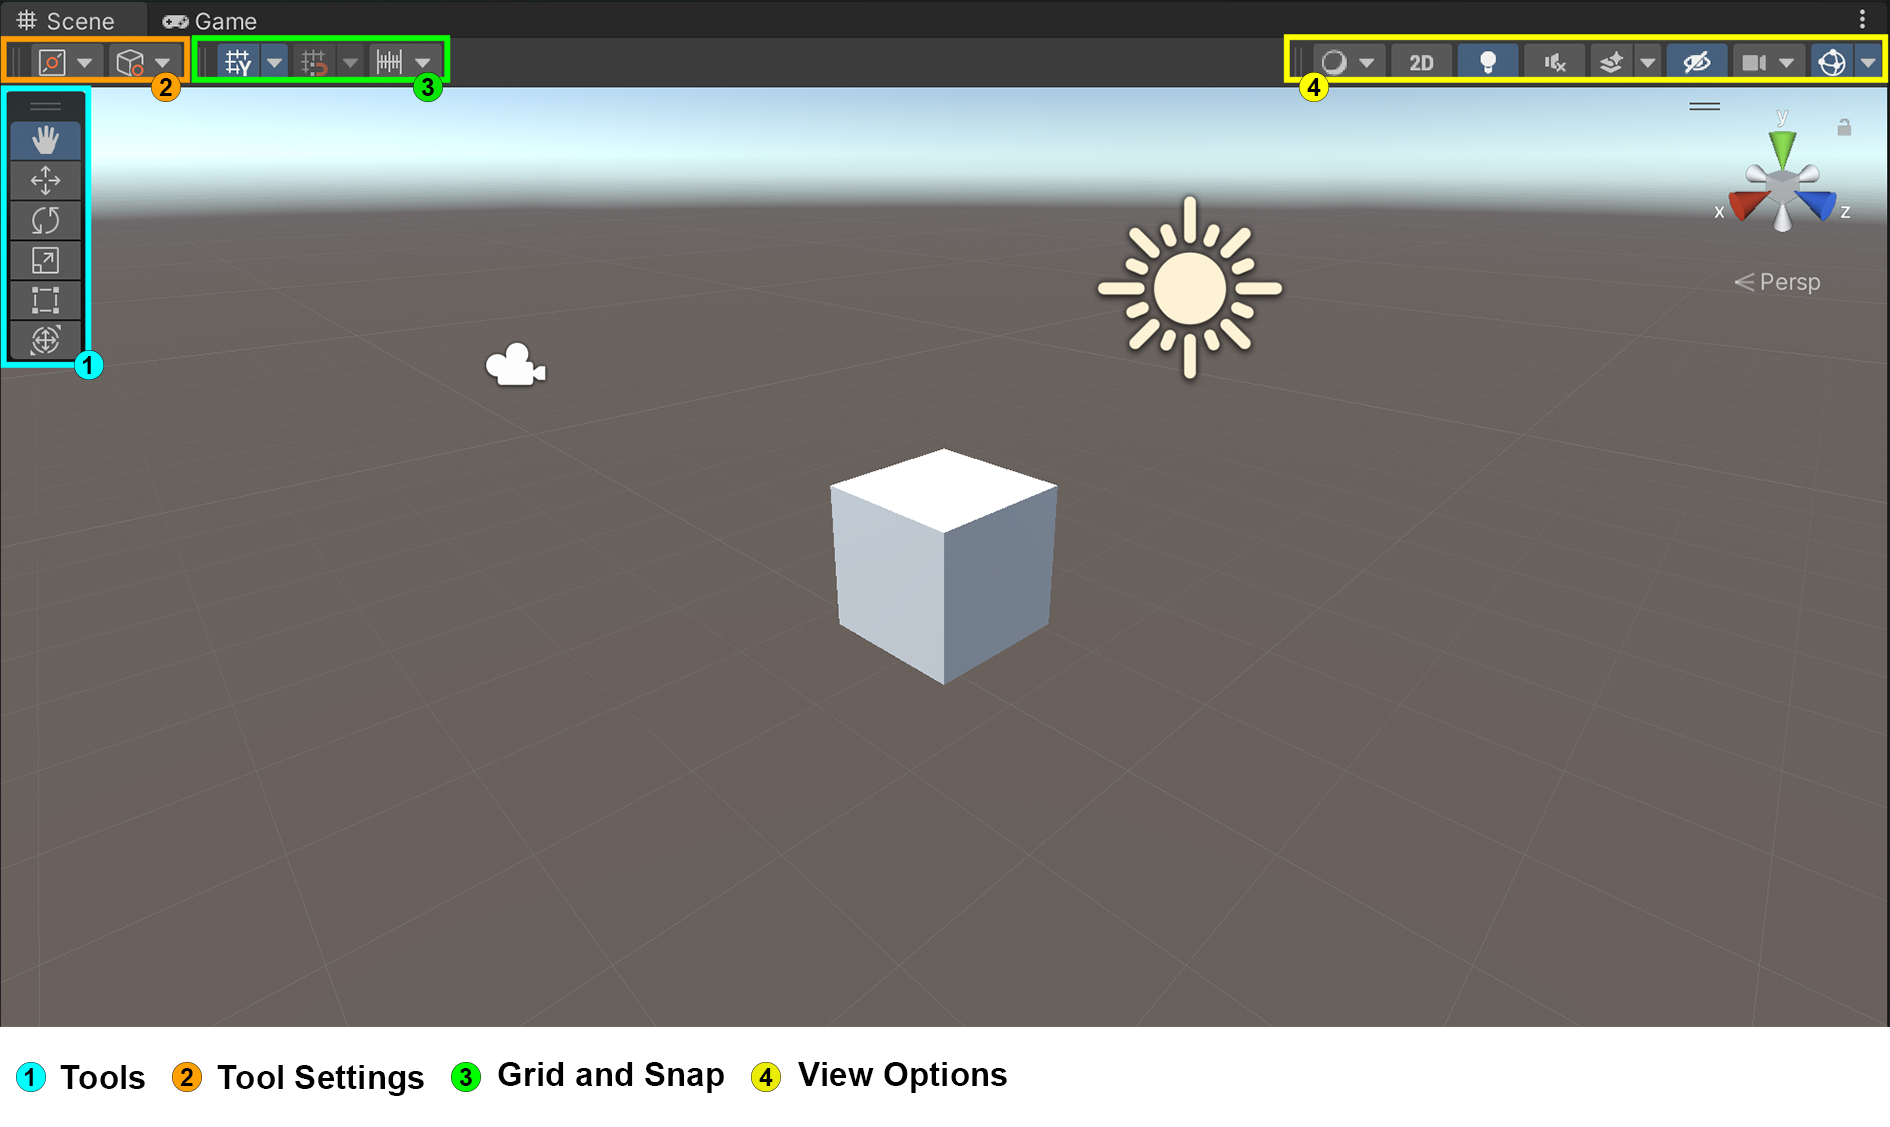
Tools
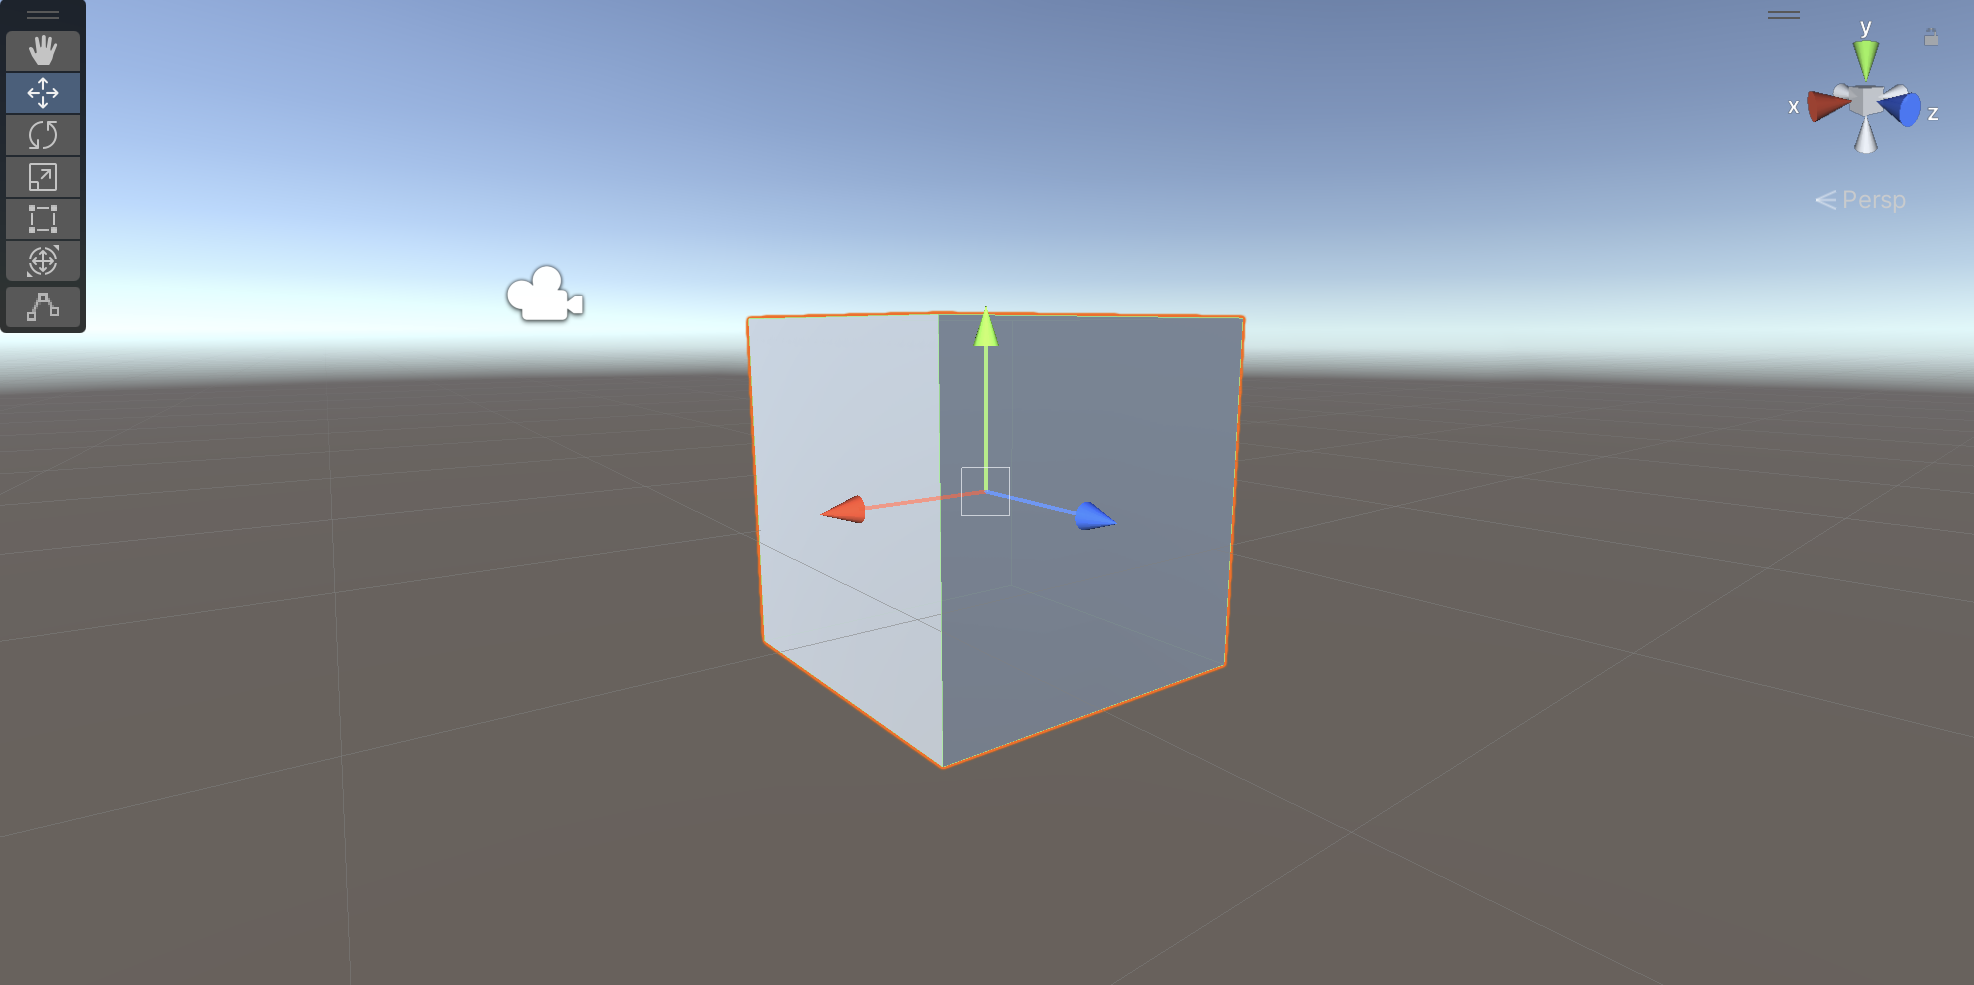
This panel contains various tools that can be used to modify the placement, rotation and size of objects in the scene. Each tool has a gizmo associated with it that allows you to modify the game object along a specific axis.
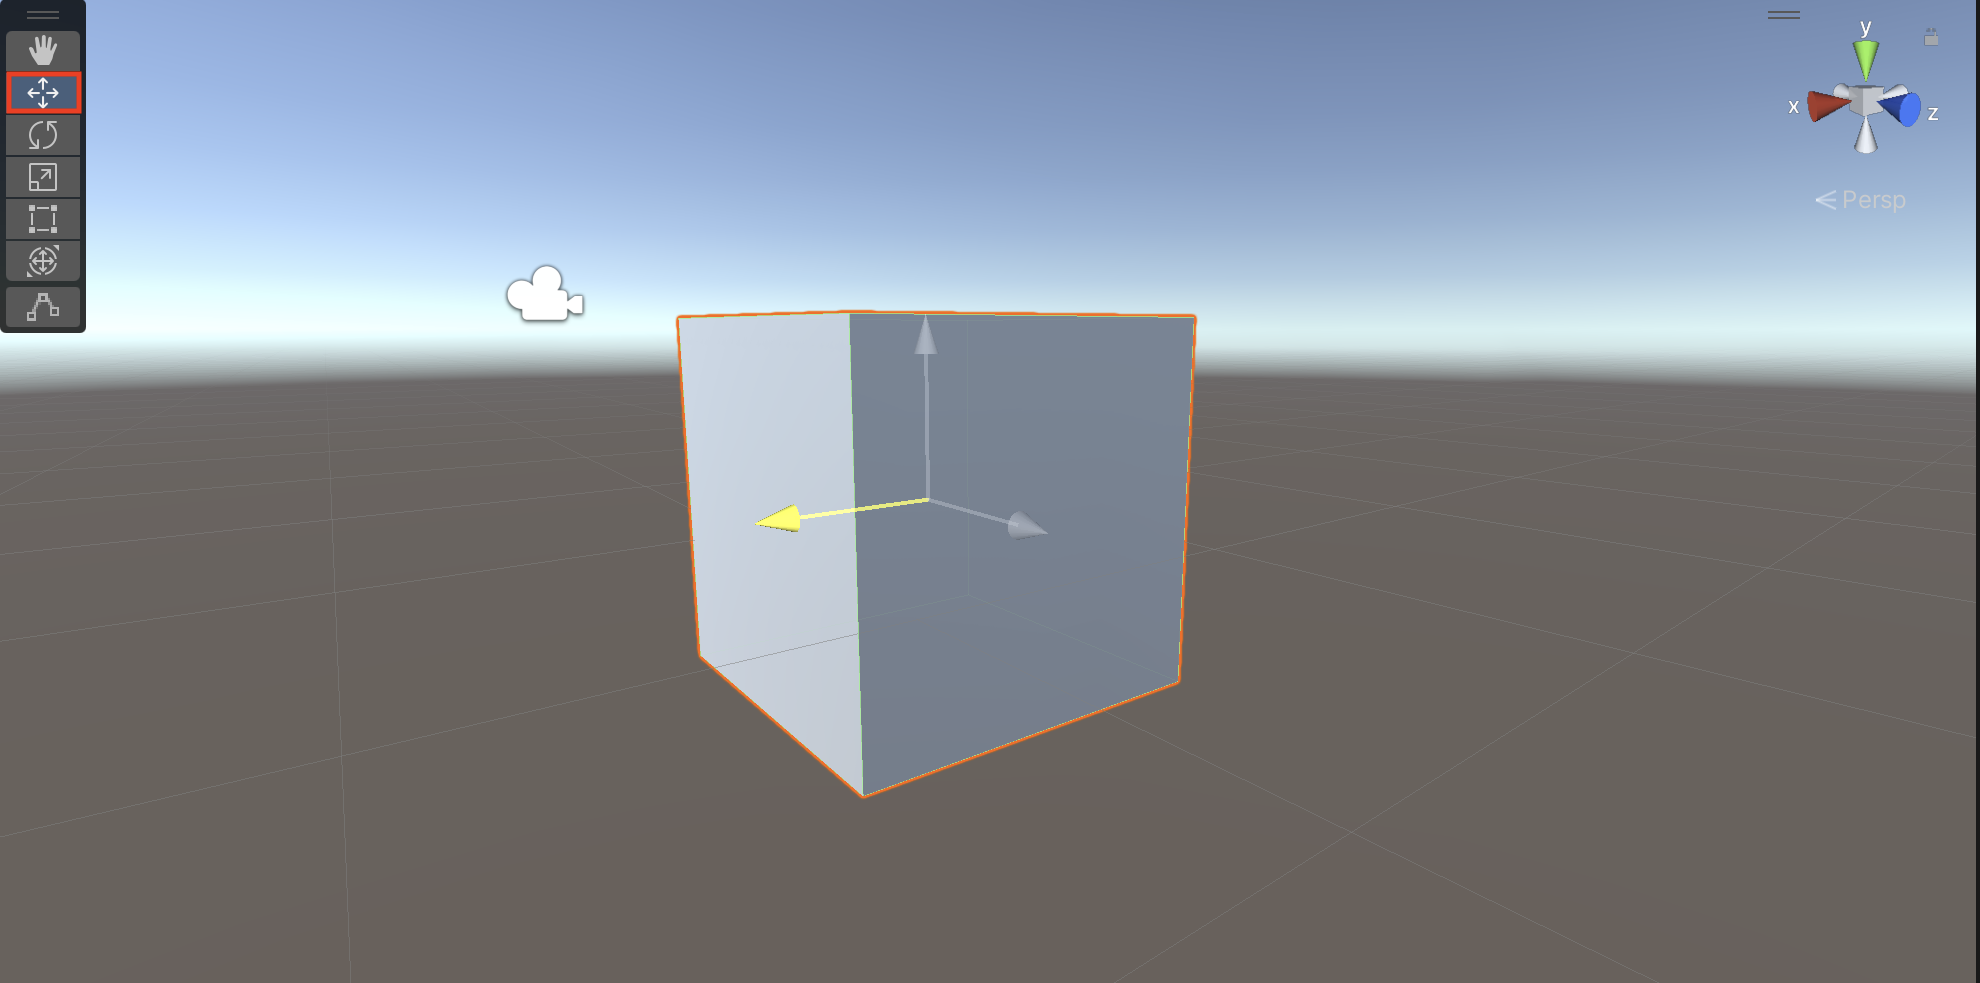
Using the Move Tool to Move a Game Object Along the X-Axis 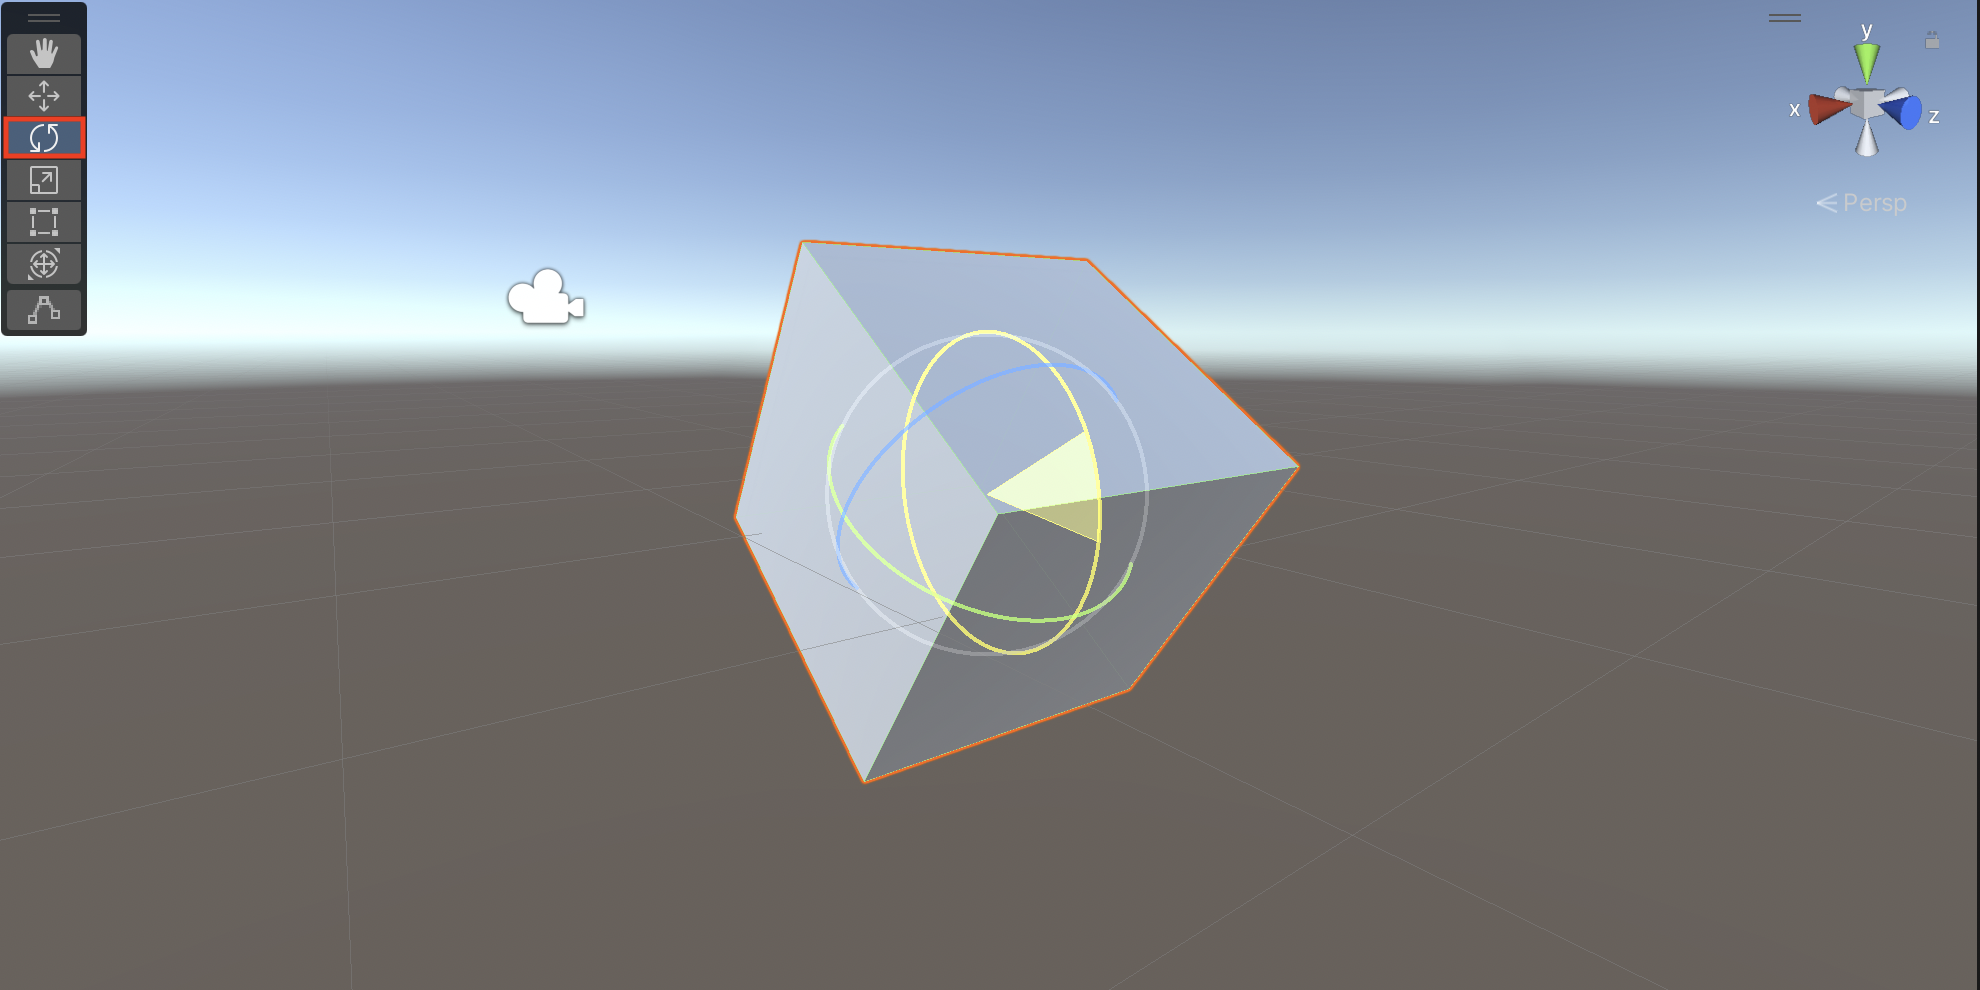
Using the Rotate Tool to Rotate a Game Object Along the X-Axis As the game object is modified, the values in the transform component (present in the inspector window) are updated accordingly. Notice the changes in the scale along the
Xaxis in the image below, as the game object is adjusted in size -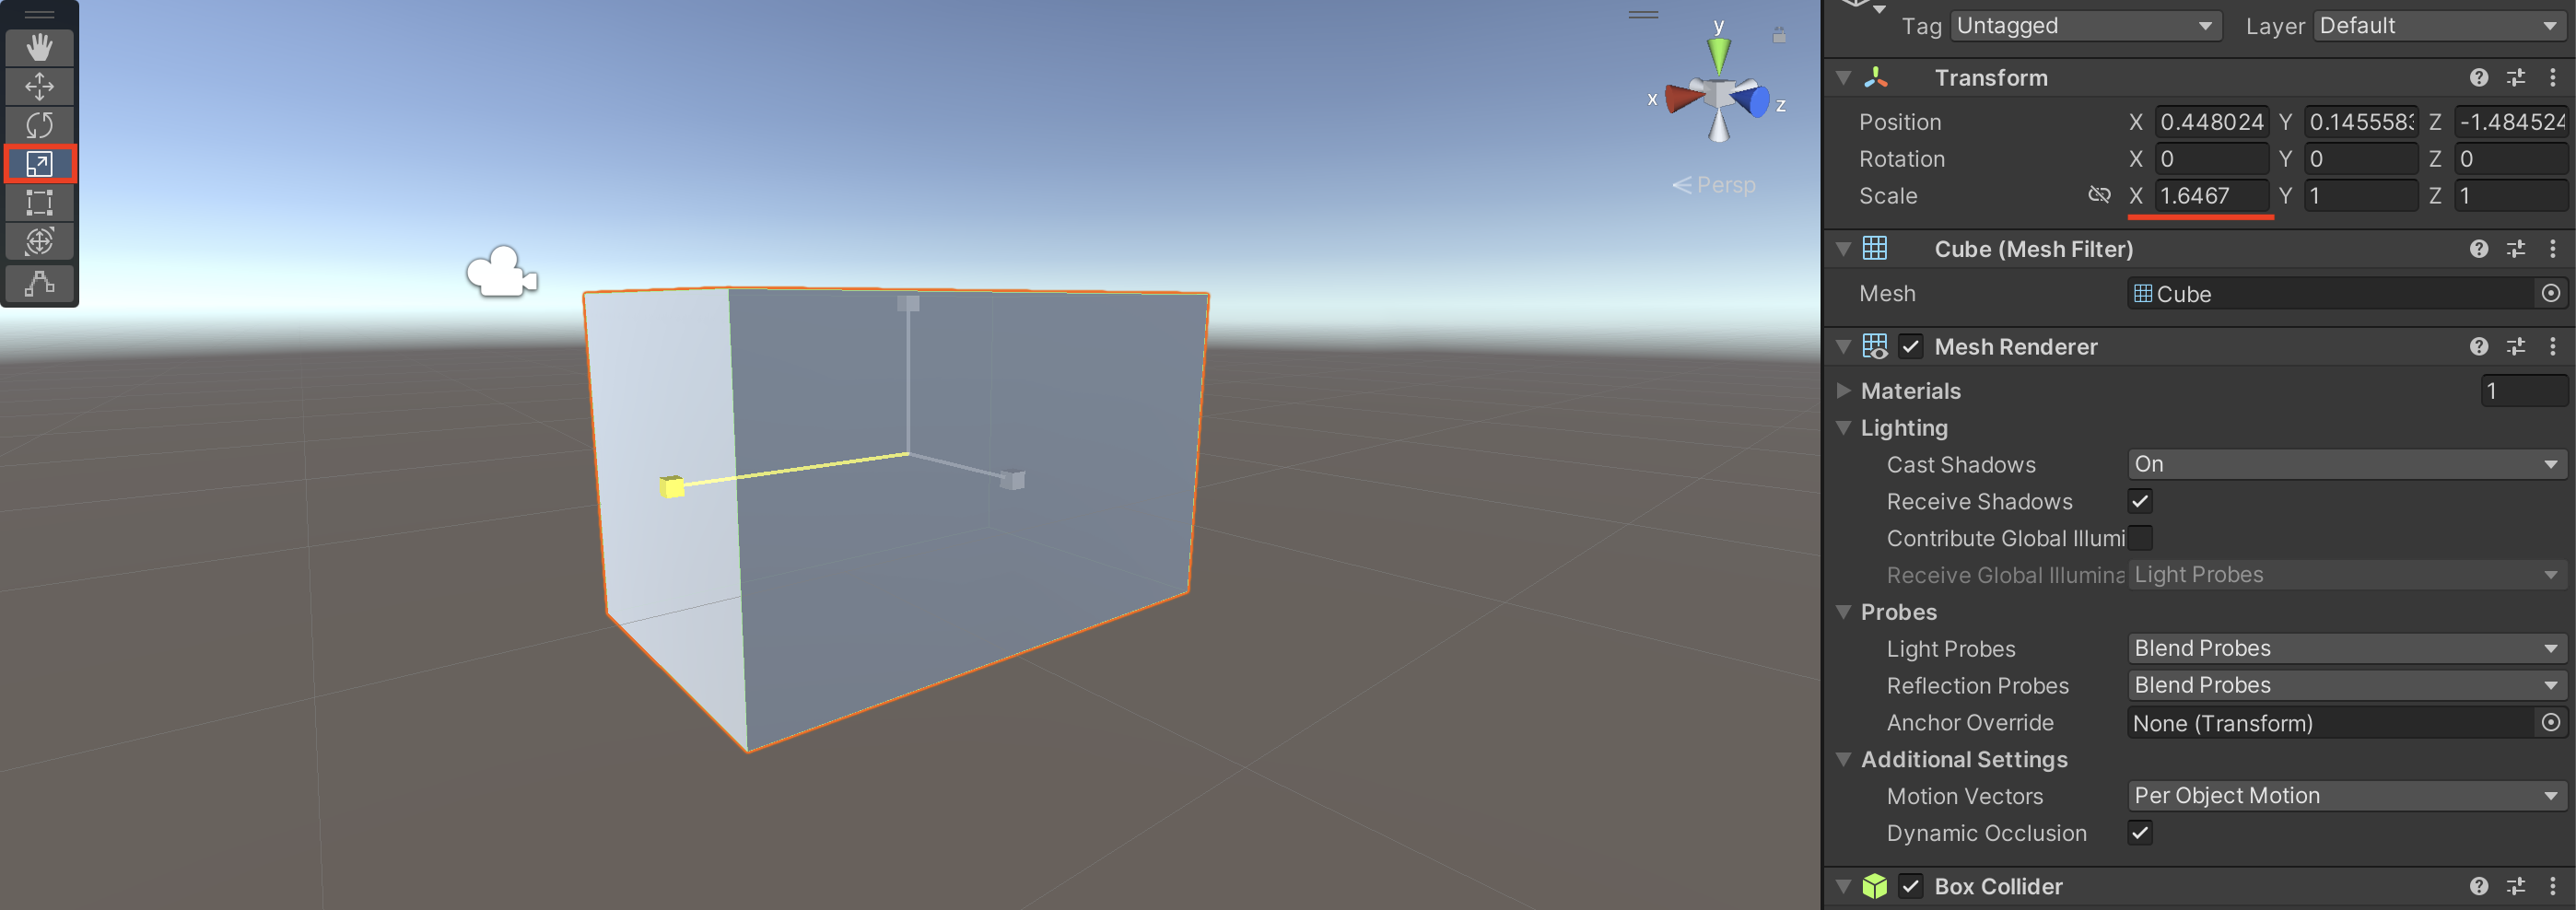
Using the Scale Tool to Scale a Game Object Along the X-Axis There is also a transform tool that lets you combine and apply multiple transformations (move, rotate and scale) to a game object -
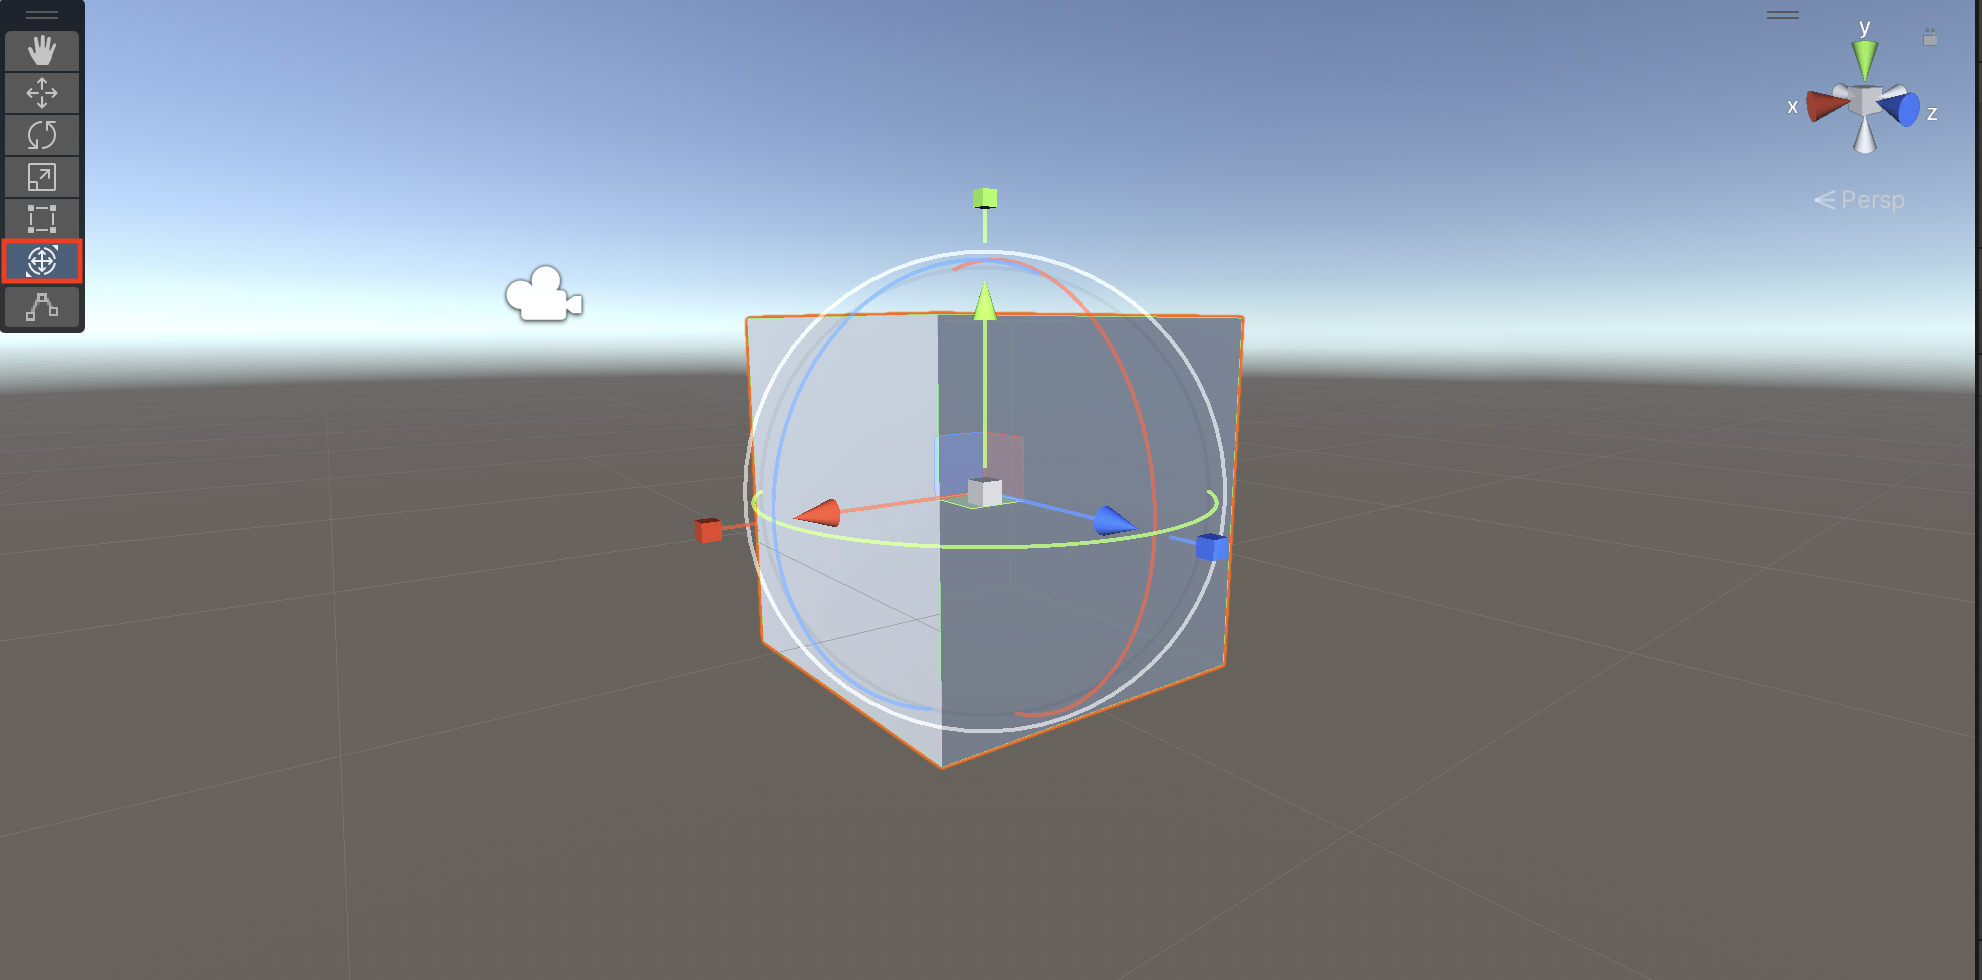
Using the Transform Tool to Apply Transformations to a Game Object Tool Settings
This panel contains settings for adjusting the position and rotation of the tool handle.
Grid and Snap
This panel contains settings for adjusting the visibility of the grid and for toggling grid snapping.
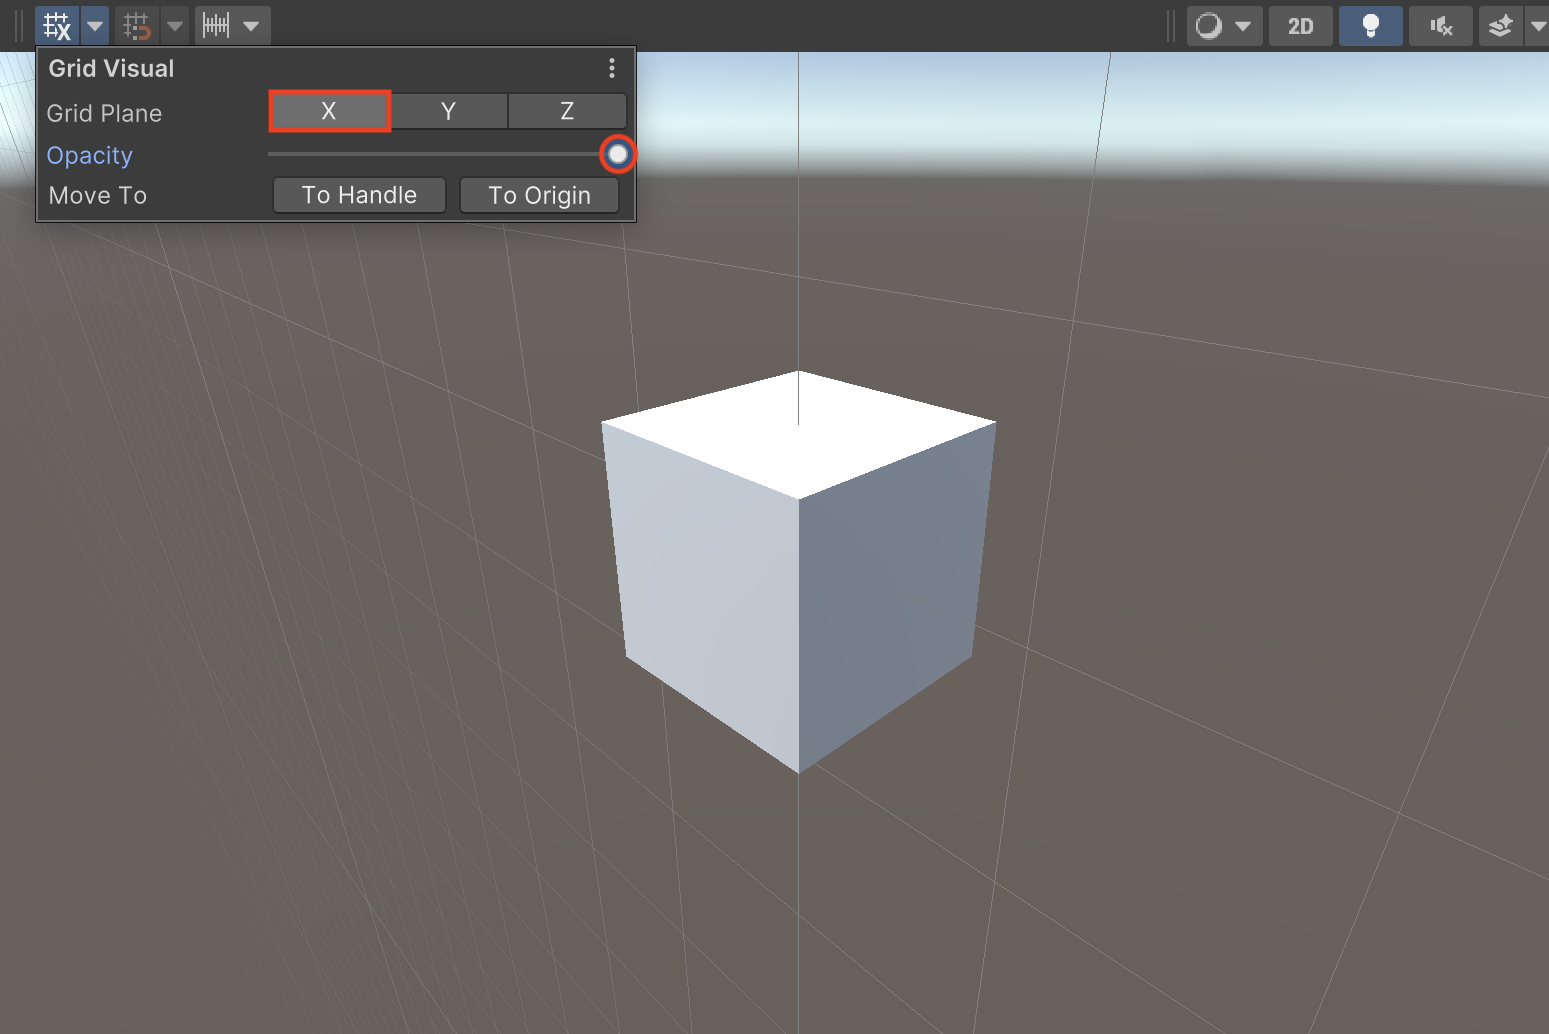
Adjusting the Visibility and Placement of the Grid View Options
This panel contains settings for adjusting the draw mode - whether the scene is to be shaded or wireframed, managing global illumination, toggling camera modes (2D/3D), adjusting scene lighting, audio mode, effects and visibility of objects.
It also contains settings for adjusting the camera and the visibility of gizmos in the scene window.

2D Camera Mode in the Scene Window
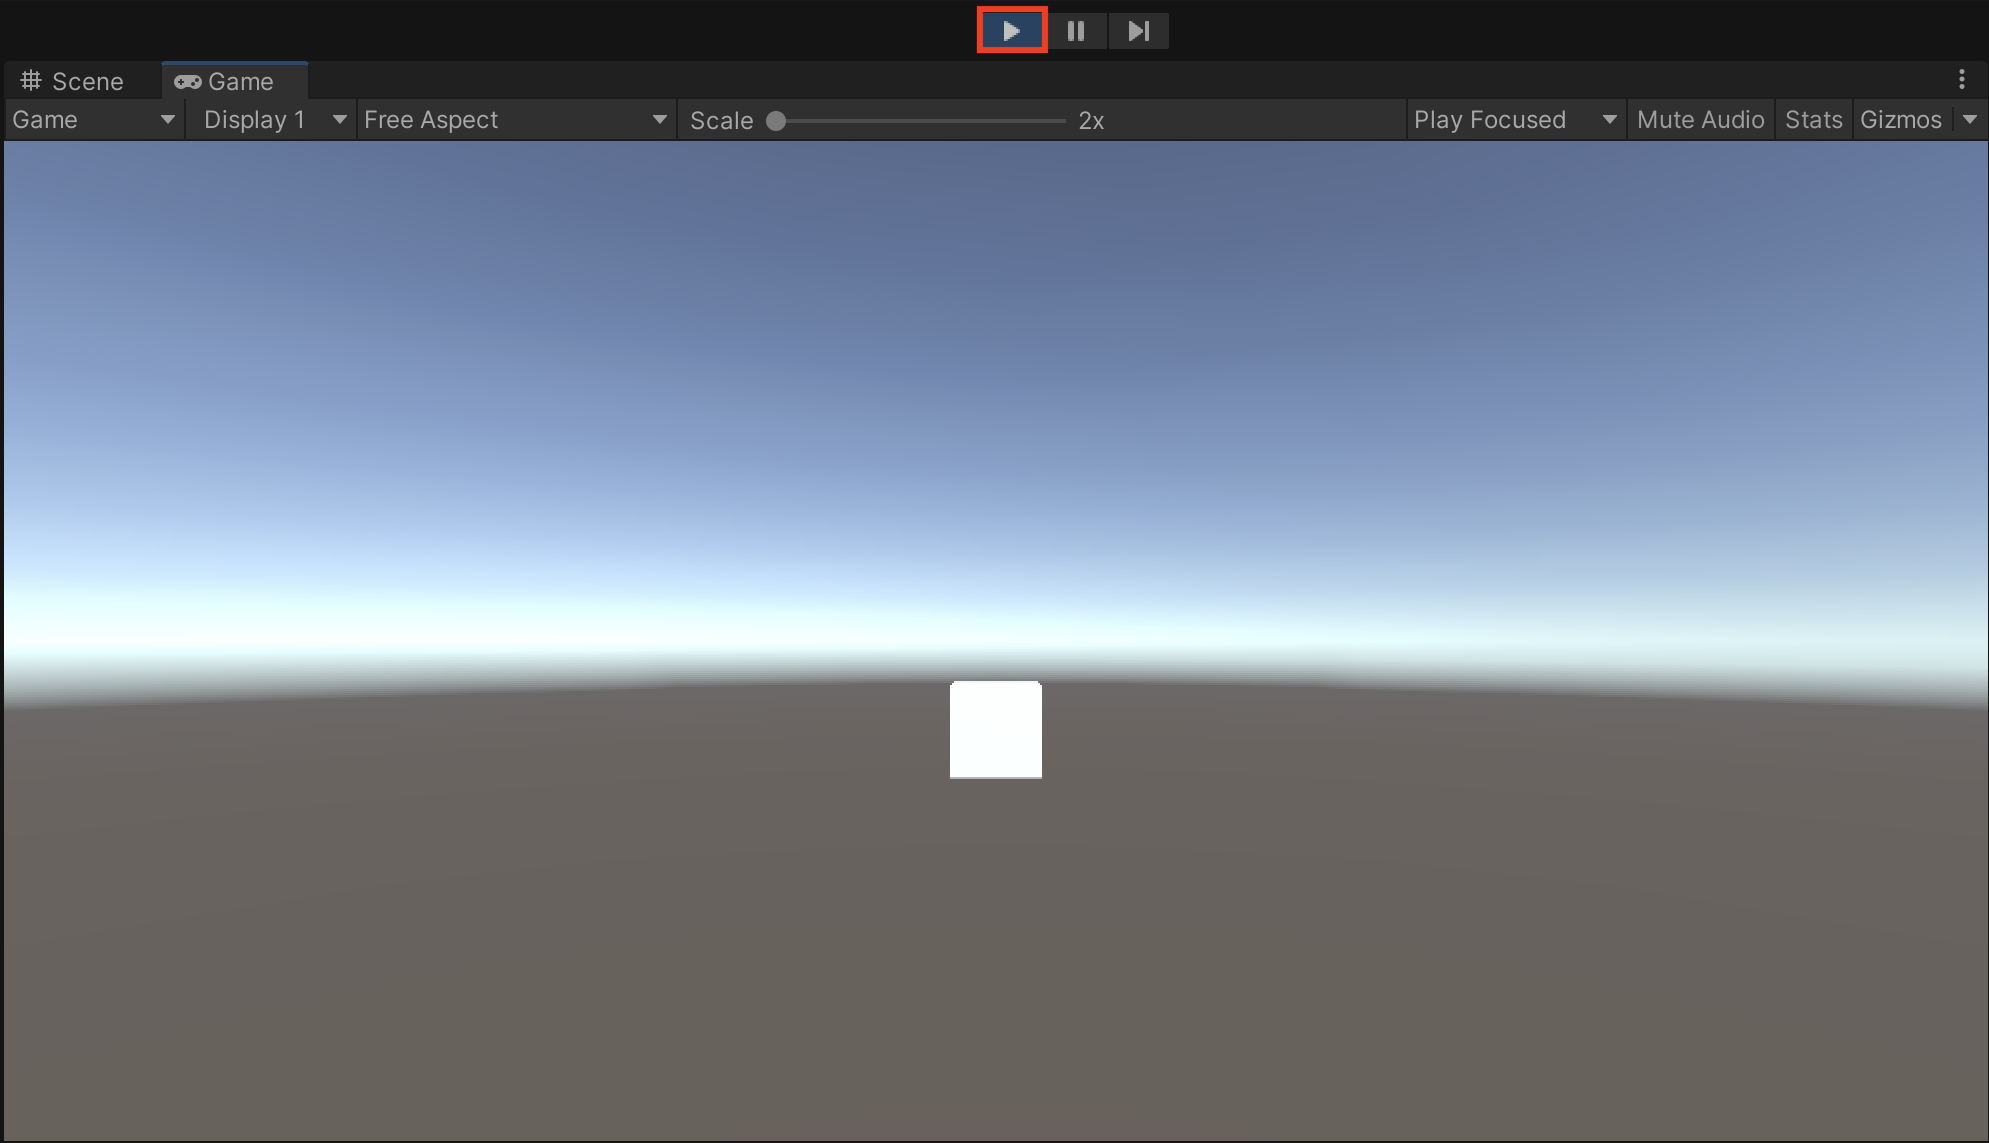
Running Your Project
To run your project you can click on the play button located on the toolbar. Once you click on it, your scene will load in the game window where you can playtest it.
You can click on the play button again to exit the game window and go back to the scene.
If you need to create an executable, you can build your package by going to File > Build And Run or by using this keyboard shortcut - Cmd+B (Mac)/Ctrl+B (Windows). This will compile your project and build a standalone executable package that you can run.
There you have it, a small introduction to the Unity Editor!
In this blog post, we looked at what the Unity Editor is, how to install and use it to create a 3D scene and add objects to it. If it feels a bit intimidating then do not worry, it is totally fine. The best way to learn Unity is to start small, get a grasp of the basics and then work your way from there.
For more blog posts and tutorials on Unity development, please click here.
If you have any questions or suggestions, please leave a comment down below. Also if you want to stay up to date with the latest happenings at example.com, feel free to follow me on Twitter.
Cheers!

Arun Michael Dsouza
Lorem ipsum dolor, sit amet consectetur adipisicing elit. Veniam recusandae consequatur necessitatibus modi nostrum ullam.
Related Posts
Introduction to the Unity Game Engine
Unity is a real-time graphics development engine used to create …
Jul 26, 2022

What Is Unity Asset Store and How to Download Assets From It
The Unity Asset Store is a marketplace for purchasing and …
Jul 13, 2022
What Are Unity Editor Modules and How to Install Them
Unity Editor Modules are add-ons that can be downloaded and …
Jul 07, 2022
What Is Unity Hub and How to Install It
Unity Hub is an application comprising of all the essential tools …
Jun 28, 2022